OS X: Time Machine backup after hardware repairs
March 7, 2015 1 Comment
 Courtesy of Apple, my laptop suffered a brain surgery, and the main board was replaced. Now it is almost as good as new, but since it still has a history, I would like to preserve it.
Time Machine is a great tool, the kind of setup-and-forget, but if you exit the beaten path, things can get pretty nasty.
Hardware UUID and MAC address
One such thing is the hard link between the backup storage and the hardware which performed the backup. Apple decided to identify the backup using the host name, which is ok, it does not change by itself and can be controlled easily, but also decided to store the hardware unique ID and the Ethernet MAC address.
So, if you move the main disk to another computer, or replace the main board, Time Machine will no longer recognise the backup and will most probably start a new history.
Problem
You know that you have a problem, if Time Machine does not know of any previous backups:

Amnesiac Time Machine.
Technically, the problem seems to be a Time Machine backup volume out of sync with the new hardware configuration.
Gather data
Before proceeding further, you need to gather the required data, the hardware UUID and the MAC address.
Both can be found in the System Information pages:

Hardware UUID.
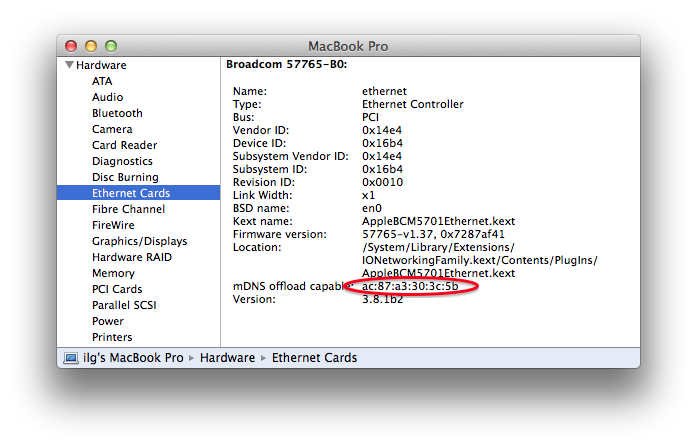
Ethernet MAC address.
Solution
Since Apple does not provide any special tool to update the backup volume, all changes should be done manually, using commands in the terminal.
Identify the backup location
The first step is to identify the location where Time Machine stores the backups.
For remote volumes (the highly recommended solution, as opposed to local volumes), Time Machine uses a sparsebundle, named by the host name.
If you do not use sparsebundles (which is by all means not recommended), you’ll identify on your backup disk a folder called Backups.backupdb; skip directly to the section referring to it.

Backup volume.
Right click the sparsebundle, and select Show Package Contents. Select the com.apple.TimeMachine.MachineID.plist file.

Machine UUID.
Update the HostUUID
If the HostUUID does not match the Hardware UUID, edit the file and replace the String value.

Edit HostUUID.
Backups.backupdb, the backup volume
The next step requires access to the content of the sparsebundle. For this go back to the previous location, select the sparsebundle, right click and select Open With → DiskImageMounter.app. A few seconds later a new volume Time Machine Backups will appear on your desktop.
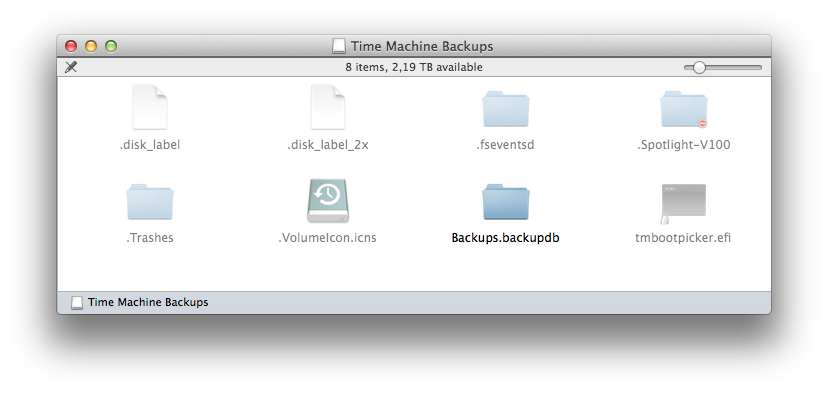
Time Machine Backups volume.
Since the next steps require command line access to the file, open a Terminal and go to the volume folder.
$ cd /Volumes/Time Machine Backups/
$ ls -l
total 232
drwxr-xr-x+ 6 root  wheel     204 Nov 24  2013 Backups.backupdb
-rwxr-xr-x@ 1 root  wheel  115716 Sep 30  2013 tmbootpicker.efi
$ ls -l Backups.backupdb
total 0
drwxr-xr-x@ 48 root  wheel  1666 Mar  7 12:00 ilg's MacBook Pro
Update extended attributes
Due to some unfortunate historical reasons, Apple stores some metadata as extended attributes:
$ xattrl -l Backups.backupdb/ilg's MacBook Pro
com.apple.backupd.BackupMachineAddress: c8:2a:14:11:95:f3
com.apple.backupd.HasRecoverySet: YES
com.apple.backupd.HostUUID: A8654C15-1030-5D55-BFA9-6AED5BBC7237
com.apple.backupd.ModelID: MacBookPro8,2
Changing them directly is not possible, being protected by ACLs:
ls -le . Backups.backupdb/
.:
total 232
drwxr-xr-x+ 6 root  wheel     204 Nov 24  2013 Backups.backupdb
 0: group:everyone deny add_file,delete,add_subdirectory,delete_child,writeattr,writeextattr,chown
-rwxr-xr-x@ 1 root  wheel  115716 Sep 30  2013 tmbootpicker.efi

Backups.backupdb/:
total 0
drwxr-xr-x@ 48 root  wheel  1666 Mar  7 12:00 ilg's MacBook Pro
 0: group:everyone deny add_file,delete,add_subdirectory,delete_child,writeattr,writeextattr,chown
ilg-mbp:Time Machine Backups ilg$
To remove these ACLs, use chmod -N:
sudo chmod -N Backups.backupdb/ Backups.backupdb/ilg's MacBook Pro/
Now finally update the extended attributes with xattr -w:
$ sudo xattr -w com.apple.backupd.HostUUID B9D90459-D700-509D-BB2F-7571E482F846 Backups.backupdb/ilg's MacBook Pro/
$ sudo xattr -w com.apple.backupd.BackupMachineAddress ac:87:a3:30:3c:5b Backups.backupdb/ilg's MacBook Pro/
$ xattr -l Backups.backupdb/ilg's MacBook Pro/
com.apple.backupd.BackupMachineAddress: ac:87:a3:30:3c:5b
com.apple.backupd.HasRecoverySet: YES
com.apple.backupd.HostUUID: B9D90459-D700-509D-BB2F-7571E482F846
com.apple.backupd.ModelID: MacBookPro8,2
Restore the ACLs:
sudo chmod +a 'group:everyone deny add_file,delete,add_subdirectory,delete_child,writeattr,writeextattr,chown' Backups.backupdb/ Backups.backupdb/ilg's MacBook Pro/
Unmount the volume
For the changes to take effect, close the terminal and unmount the Time Machine Backups volume.
Enter Time Machine
To be sure the new changes are considered, re-select the backup disk:

Re-select the backup disk.
From the menu bar, select Enter Time Machine; after a few moments while the system validates the backup, the previous backup history should be visible.
Further backups will use it and save only newly changed files.
Conclusion
Although complicated by the use of extended attributes and protected by ACLs, the hardware details associated to Time Machine backups can be updated, and old backups can still be preserved.
This procedure may be be useful when the main board was replaced or you moved the disk to another computer.

Pingback: OS X: Time Machine preventive maintenance | ilg The Geek's blog